- There is a possibility that you may have an abnormal print result which is the one of following "Abnormal nozzle test". Please see which type of abnormal nozzle test you have and refer the information for each.
【Abnormal nozzle test example a - g】
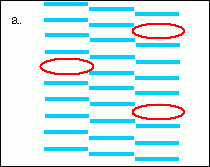
a. Unstable nozzle out
The missing nozzles change its position after cleanings.
This phenomenon may be happened because of the following causes.
・ Air bubbles in the ink line or print head nozzle area, and it does not come out.
・ The wiper rubber blade is rounded and not sharps enough.
・ The wiper rubber blade has the gelled ink or dried ink on it.
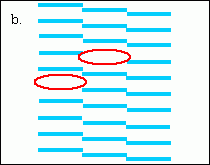
b. Stable nozzle out
The missing nozzles do not change its position all the time.
This phenomenon may be happened because of the following causes.
・ Some kinds of dusts are inside or on the surface of print head nozzles. The print head nozzle surface, cap rubber, and wiper rubber has to be cleaned every day.
・ The print head surface might be damaged by head crash with the media.
・ It had been used for long time with high head gap which is larger than 3.0mm (≒ 0.118 inch) or more.
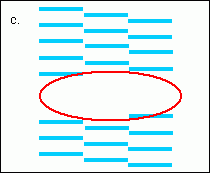
c. Multiple missing nozzles
Many adjacent nozzles out at the same time.
This phenomenon may be happened because of the following causes.
・ Poor air seal in some where inside the ink line.
・ Air bubbles on the cap rubber and when it breaks.
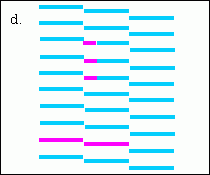
d. Mixed Color-(1)
Base color has another color on the nozzle test.
Like if Cyan nozzle test has Magenta color on it, and the Magenta color is the normal magenta density, this phenomenon may be happened because of the following causes.
・ Ink mist might be attached on the print head nozzle surface.
・ The wiper rubber blade is rounded and not sharps enough.
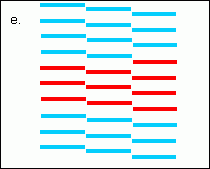
e. Mixed Color-(2)
If the color is completely mixed, this phenomenon may be happened because of the following causes.
・ There is a possibility of the both ink lines are mixed on the same cap rubber, and it may flow back into the ink line little bit.
・ The wiper rubber blade and cap rubber may be dirty.
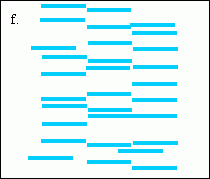
f. Nozzle deflection-(1)
Nozzles are deflected from correct position to Right-Left-up-Down.This phenomenon may be happened because of the following causes.
・ Some kinds of dusts attaches on the print head nozzle surface.
・ The head gap might be too high to print on the media surface, and the fired ink can not be straight.
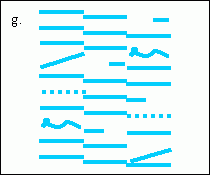
g. Nozzle deflection-(2)
Nozzles are deflected so badly if you compare to nozzle deflection-(1).
(Ex) Curled, Dotted line, Fired half size, Crooked a lot, etc
This phenomenon may be happened because of the following causes.
・ Some kinds of dusts are inside or on the surface of print head nozzles. The print head nozzle surface, cap rubber, and wiper rubber has to be cleaned every day.
・ The print head surface might be damaged by head crash with the media.
・ It had been used for long time with high head gap which is larger than 3.0mm (≒ 0.118 inch) or more.
【Recovery Procedure】
1. Make sure that the printer environment condition (Temperature, Humidity, and Dust) is under the specification or not.
・Allowable Room temperature:15~30℃ (59~86F)
・Accuracy ensuring temperature:20~25℃ (68~77F)
・Relative Humidity:35~65% (With no dew condensation)
・Temperature Gradient: [±10℃ (18F)/h or less]
・Dust: [Equivalent to the normal office level: The floating dust amount has to be 0.15mg/㎥ or less]
2. Perform a cleaning
Perform the following cleanings and see the result after that.
・Normal Cleaning, 2 times, and Hard Cleaning, 2 times
3. Check the remaining amount of the ink pack
Even if the remaining ink level which is displayed on the printer display is enough, please hold the ink pack and check the actual amount. If actual ink amount is enormously lighter than the displayed remaining ink level, please replace it with the new ink pack.
4. Press [ST.MAIN] key, select [Carriage out], and check the following condition.
a. Make sure that the wiper rubber is not damaged, distorted, or dirty.
b. Replace the wiper rubber with new one if the current wiper rubber has a slit on the center of the cap rubber. If it has slit which means it is an old type.
You can order it with [P/N: SPA-0171], [Name: Wiper kit]

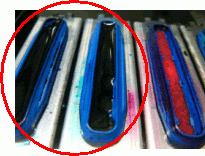
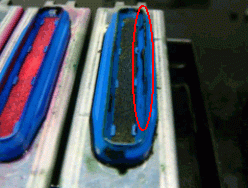
c. Check the cap rubber when the print head carriage moves.Like as you can see it in pictured right, if cap rubber hasink inside, please tell a technician about it when you contactservice.
d. Make sure that the cap rubber edge does not have dried ink or gelled ink.
Even if the cap rubber has dried ink or gelled ink, if it is on the cap edge, the printer can notperform cleaning correctly because the cap rubber edge does not seal the print head surface correctly.
If the cap rubber is not clean, wet the maintenance cloth or cleaning swab with the cleaning solution and wipe the edge.
You can order the Maintenance cloth with [P/N:SPC-0677], [Name: Maintenance cloth].
Caution: Do not use a normal fabric cloth to wipe the cap rubber due to protect the print head surface from dust which is from the cloth.
e. Clean around the print head
Move the print head carriage to the maintenance station which is the left side of gantry, and clean “around” the print head with the maintenance cloth or cleaning swab which is wetted with cleaning solution.
Caution: Do not wipe the print head “nozzle surface”.
There is a possibility that the print head will be clogged and needs head replacement.
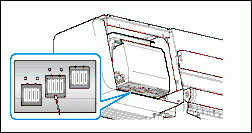
5. Press [ST. MAIN] key, and select [Nozzle Clean]Through out this function, you fill up the cleaning solution on the cap rubber, and cap the print head surface. After you wait for couple of minutes the ink dirt gets be soft which is on the print head nozzle surface.
6. Perform a [Ink fill up]. Please see the following manual to do this function. 『Operation manual 』-[Chapter 4]-[If nozzle clogging is not solved (ink filling)]
7. If you can not have any better result even you tried everything above, please contact a technician.