Data operations
The data management function allows the following operations:
- PICT sign in/sign outPICT sign in/sign out
- Create new dataCreating new data
- Edit saved dataEditing saved data
- Rename saved dataRenaming saved data
- Delete saved dataDeleting data
- Duplicate saved dataDuplicating saved data
- Export saved dataExporting saved data
PICT sign in/sign out
If the account icon indicates that you are not signed in to PICT, click the icon to display the PICT sign-in dialog.

If you already have a PICT account, sign in to PICT as follows:
- Enter your PICT account (email address).
- Enter your password.
- Click [Sign In].
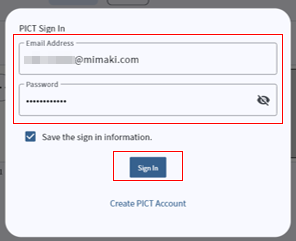

- If you are not signed in with a PICT account, the PICT sign-in dialog will appear when Simple Create is launched.
If you do not wish to sign in, click outside the dialog to close it. - Signing in with a PICT account allows you to use the functions introduced from Simple Create ver. 2.0 or later.
- Selecting the "Save the sign in information." check box allows you to skip entering your email address and password the next time you sign in.
- If you do not have a PICT account, you can create a new account by clicking [Create PICT Account], which displays the PICT Print Dashboard.
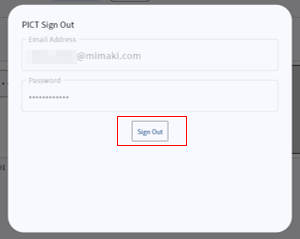
- If the account icon indicates that you are already signed in, clicking the icon will display the PICT sign-out dialog. Click [Sign Out] to sign out from PICT.
Creating new data
- On the Home screen, select the type of data to create (design, form with designs), then click the Create New icon ("+").

- The corresponding Create screen appears.
- Create the data on the corresponding screen.
For more information on creating data, refer to the following:
- Click [Save&Previous] ("<").

- The data is automatically saved. The display returns to the Home screen with thumbnails for the data created.
- Before you save the data for the first time, a dialog box will prompt you to rename the data. Enter the desired name.
Editing saved data
- On the Home screen, click the thumbnail for the data to be edited (design, form with designs, or form).
- The corresponding Edit screen appears for the data to be edited.
- Edit the data.
- Click [Save&Previous] ("<").
- The data is automatically saved.
- The display returns to the Home screen with thumbnails for the data created.
Renaming saved data
- On the Home screen, click the "
 " at the top right of the thumbnail for the data to be renamed (design, form with designs, or form).

- Displays the submenu.
- Click [Rename].

- The [Rename] dialog box appears.
- Rename the data, then click [Save].

Deleting data
- On the Home screen, click the "" at the top right of the thumbnail for the data to be deleted (design, form with designs, or form).
- Displays the submenu.
- Click [Delete].

- A confirmation dialog box appears.
- Click [OK].
- The saved data is deleted.
Duplicating saved data
- On the Home screen, click the "" at the top right of the thumbnail for the data to be duplicated (design, form with designs, or form).
- Displays the submenu.
- Click [Duplicate].

- The data is duplicated with the name "original name + '- copy'".
Exporting saved data
- On the Home screen, click the ellipsis button () in the upper right of the thumbnail for the data to export (design, form with designs, or form).
- A menu appears.
- Click [Export].

- The [Save as] dialog box appears.
- Enter the desired name, then save the file.
- The default file name is "data name + extension".
- The file extension will vary as follows, depending on the data format:
·Design: ".scd"
·Form with designs: ".scj"
·Form: ".scb"
- Exported files can be imported using Simple Create installed on other devices.

- Data exported using Simple Create ver. 2.0 cannot be imported using ver. 1.0 or ver. 1.1.
Importing files
- Click the [Settings] menu.

- A menu appears.
- You can also import data using [Open] in the [File] menu.
- Click [Import file].

- A dialog box appears for opening the file.
- Select the data file to be imported, then click [Open].
- The Edit screen corresponding to the data imported is automatically displayed.
- The imported data is displayed on the Home screen together with the corresponding thumbnail.
- If data exists with the same name, numbers ("_1", "_2", and so on) will be appended to the end of the data name.